Searching

Selasa, 01 September 2020

OSPF Konfiguration


Senin, 02 September 2020

Configuration OSPF

            Gambarkanlah topologi dibawah ini :


Tabel Addressing :

Device

Interface

IP add

Subnet Mask

Dafault Gateway

R1

Fa0/0

192.168.1.254

255.255.255.0

N/A

Fa1/0

12.12.12.1

255.255.255.0

N/A

Lo1

172.16.1.1

255.255.255.0

N/A

Lo2

172.16.2.2

255.255.255.0

N/A

R2

Fa0/0

192.168.2.254

255.255.255.0

N/A

Fa1/0

12.12.12.2

255.255.255.0

N/A

Lo3

172.16.3.3

255.255.255.0

N/A

Lo4

172.16.4.4

255.255.255.0

N/A

Sw1

N/A

Vlan 1

N/A

N/A

Sw2

N/A

Vlan 1

N/A

N/A

Pc0

NIC

192.168.1.1

255.255.255.0

192.168.1.254

Pc1

NIC

192.168.2.1

255.255.255.0

192.168.2.254


Tujuan :

Setting OSPF

Setting-router-id OSPF

Setting Passive-interface 


Konsep Dasar

OSPF singkatan dari Open Shortes Path First

OSPS merupakan routing protocol open standart yang diimplementasikan oleh berbagai macam vendor, termasuk cisco

Link State Protocol

OSPF bekerja dengan menggunakan Algoritma Djikstra

HOP Count Unlimited

Metric : Cost(Cost=10^8/BW)

Adminitrative Distance: 110

Classes routing protocol

Mendukung VLSM dan CIDR

Hanya mendukung equal cost load balancing

Terdapat konsep area untuk memudahkan manajemen dan control tarffic

Menyediakan design hierarki dengan multiple area

Harus memiliki satu area yang disebut sebagai area 0 atau backbone area

Semua area selain 0(non-backbone area) harus terhubung kearea 0

Dari scalabilitas lebih baik di bandingkan dengan protocol distance vector

Mendukung autentikasi

Update melalui multicast address:224.0.0.5

Konvergnsi cepat

Mengirikan hello packet setiap 10 detik

Trigger/increment updates router mengirimkan update hanya jika terjadi perubahan dan tidak mengirimkan semua routing table pada periodic update.

OSPF Memaintain 3 Tabel

Neighbor Tabel

Dikenal juga sebagai adjacency database

Menampilkan informasi direcly donnected router(neighbors)

Command :show ip ospf neighbor

Database Tabel  

disebut juga LSBD(link state database)

Menampilkan semua kemungkinan informasi route menuju network dalam satu area

Commad : show ip ospf database

Routing table

Menampillkan best route menuju destination

Commad : show ip route


Keuntungan OSPF:

Open standar

Tidak ada batasan julah hops

Loop free

Konvergensi lebih cepat

Kerugian OSPF :                                 

Mengkonsumsi lebih banyak resourse CPU

Kompleks dalam design dan implementasi

Hanya mendukung equal load balancing

Hanya mendukung protocol IP :

Konfigurasi pada Router 1 (sebelah kiri)

Router>en

Router#conf t

Router(config)#hostname R1

R1(config)#enable secret satu

R1(config)#line console 0

R1(config-iline)#password satu

R1(config-line)#exec-timeout 5 0

R1(config-line)#login

R1(config-line)#exit

R1(config)#line vty 0 5

R1(config-line)#password satu

R1(config-line)#exec-timeout 5 0

R1(config-line)#login

R1(config-line)#exit

R1(config)#service password-encryption

R1(config)#int fa0/0

R1(config-if)#ip add 192.168.1.254 255.255.255.0

R1(config-if)#no shut

R1(config-if)#exit

R1(config)#int fa1/0

R1(config-if)#ip add  12.12.12.1 255.255.255.0

R1(config-if)# no shut

R1(config)#int lo1

R1(config-if)#ip add  172.16.1.1 255.255.255.0

R1(config-if)#exit

R1(config)#int lo2

R1(config-if)#ip add  172.16.2.2 255.255.255.0

R1(config-if)#exit

R1(config)#

Konfigurasi pada router 2 (sebelah kanan)

Router>en

Router#conf t

Router(config)#hostname R2

R2(config)#enable secret satu

R2(config)#line console 0

R2(config-iline)#password satu

R2(config-line)#exec-timeout 5 0

R2(config-line)#login

R2(config-line)#exit

R2(config)#line vty 0 5

R2(config-line)#password satu

R2(config-line)#exec-timeout 5 0

R2(config-line)#login

R2(config-line)#exit

R2(config)#service password-encryption

R2(config)#int fa0/0

R2(config-if)#ip add 192.168.2.254 255.255.255.0

R2(config-if)#no shut

R2(config-if)#exit

R2(config)#int fa1/0

R2(config-if)#ip add  12.12.12.2 255.255.255.0

R2(config-if)# no shut

R2(config)#int lo3

R2(config-if)#ip add  172.16.3.3 255.255.255.0

R2(config-if)#exit

R2(config)#int lo4

R2(config-if)#ip add  172.16.4.4 255.255.255.0

R2(config-if)#exit

R2(config)#


Kita Cek terlebih dahulu routing tabel sebelum kita melakukan route OSPF pada R1


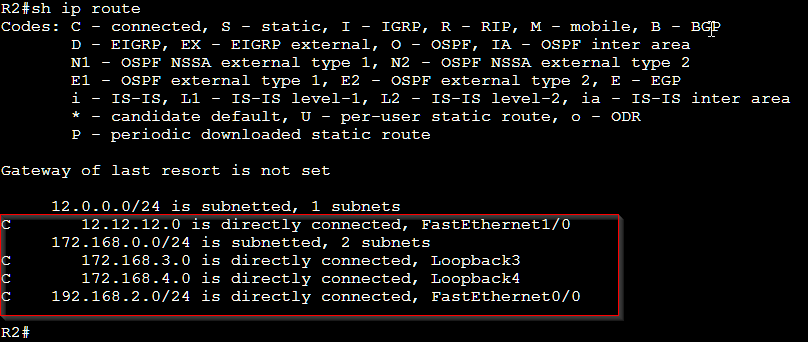
Dari gambar tersebut, hanya terdapat direcly connected network yang ditandai dengan kode C. 

Agar proses routing berhasil, harus disetting OSPF disemua router terlebih dahulu. Setelah itu baru diverifikasi dengan tes ping end-to-end devicenya.

Setting OSPF di R1

R1(config)#router ospf 1

R1(config-router)#net 12.12.12.0 0.0.0.255 area 0

R1(config-router)#net 192.168.1.0 0.0.0.255 area 0

R1(config-router)#net 172.16.1.0 0.0.0.255 area 0

R1(config-router)#net 172.16.2.0 0.0.0.255 area 0

Setting OSPF pada R2

R2(config)#router ospf 1

R2(config-router)#net 12.12.12.0 0.0.0.255 area 0

R2(config-router)#net 192.168.2.0 0.0.0.255 area 0

R2(config-router)#net 172.16.3.0 0.0.0.255 area 0

R2(config-router)#net 172.16.4.0 0.0.0.255 area 0

Berikan Ip address pada setiap PC yang ada :


Verifikasi :

Tampilkan routing table setelah Route OSPF di R1


Tampilkan Informasi Neighbor OSPF dan Informasi Routing Protocol di R1


Tampilkan Informasi Neighbor OSPF dan Informasi Routing Protocol di R2


Dari informasi routing diatas, R1 menjalan OSPF dengan proses ID 1. Ada 4 network yang di routingkan oleh R1. Administrative distance 110. R1 memiliki router ID 172.16.2.2

R1 memiliki neighbor 172.16.4.4 (IP loopback R2). 172.16.4.4 merupakan router-ID R2

Tampilkan Informasi database OSPF di R1


Diarea 0 hanya terdapat 2 router dengan ID: 172.16.2.2 dan 172.16.4.4

Tes ping dan Traceroute dari PC0 ke PC1

Gambar12 (ping pc0 ke pc1)


Tes ping dan Traceroute dari PC1 ke PC0


Tampilkan routing table spesifik OSPF di R1 


Setting router-OSPF di R1

R1(config)#router ospf 1

R1(config-router)#router-id 111.111.111.111

R1(config-router)#reload or use"clear ip ospf process" commad, for this to take effect

Setting router-OSPF di R2

R1(config)#router ospf 1

R1(config-router)#router-id 222.222.222.222

R1(config-router)#reload or use"clear ip ospf process" commad, for this to take effect

Setelah menjalankan command router-id diatas, jalankan command Clear ip OSPF process untuk mereset proses OSPF di R1 maupun R2, sehingga router-id OSPF akan berubah.

Gambar 21(clear ospf r1)


Tampilkan neighbor table OSPF di R1


Dari ouput neighbor table di R1, bisa kita lihat dikolom neighbor ID terdapat  222.222.222.222, dimana 222.222.222.222 adalah router-id R2, dengan demikian, setting router-ID OSPF di R2 telah berhasil.

Note : ulangi langkah yang sama diatas untuk mereset process OSPF dan tampilkan neighbor table OSPF di R2, pastikan neighbor ID R1 111.111.111.111

 Setting Passive-Interface OSPF di R1

R1(config)#router ospf 1

R1(config-router)#Passive-interface fa0/0

R1(config-router)#

Link Dowload .PKT dan Config ||DISINI||

Referensi :

Ebook “CCNA Lab Guide Nixtrain_1st Edition_Full Version”  Agus Setiawan

Qoutes:

"Consistency is one of the biggest factors in leading to accomplishment and success" Byron Pulsifer

'Konsistensi adalah salah satu faktor terbesar dalam menuju pencapaian dan kesuksesan'


Minggu, 30 Agustus 2020

Configuration EIGRP


Senin, 31 Agustus 2020

Configuration EiGRP

                Gambarkanlah topologi dibawah ini : 

Gambar : Topologi EIGRP


Tabel Addressing :

Device

Interface

IP add

Subnet Mask

Dafault Gateway

R1

Fa0/0

192.168.1.254

255.255.255.0

N/A

Fa1/0

12.12.12.1

255.255.255.0

N/A

Lo1

172.16.1.1

255.255.255.0

N/A

Lo2

172.16.2.2

255.255.255.0

N/A

R2

Fa0/0

192.168.2.254

255.255.255.0

N/A

Fa1/0

12.12.12.2

255.255.255.0

N/A

Lo3

172.16.3.3

255.255.255.0

N/A

Lo4

172.16.4.4

255.255.255.0

N/A

Sw1

N/A

Vlan 1

N/A

N/A

Sw2

N/A

Vlan 1

N/A

N/A

Pc0

NIC

192.168.1.1

255.255.255.0

192.168.1.254

Pc1

NIC

192.168.2.1

255.255.255.0

192.168.2.254

 Tujuan :

  • Setting EIGRP
  • Debug EIGRP
  • Setting-Passive EIGRP
Konsep Dasar
    Eigrp disebut juga sebagai routing protocol distance Vector, terkadang disebut juga advanced distance vectorR atau routing protocol hybrid

Berikut ini beberapa fitur EIGRP :
  • Cisco open Standar protocol (sebelumnya proprietary)
  • Termasuk classess routing protocol
  • Update perubahan topologi secara dinamis
  • Metric (32 bit) : Composit Metric (BW + delay + load + MTU + reliability)
  • Administrative Distance: 90
  • Update menggunakan multicast :224.0.0.10
  • Jumlah maksimum hop count: 255 (default 100)
  • Mendukung protocol IP, IPX, Apple Talk
  • Hello packet dikirim setiap 5 second (dead interval 15 second)
  • Konvergensi cepat
  • Menggunakan algoritma DUAL (diffusing Update Algoritma)
  • mendukung equal dan unequal cost load balancing
EIGRP memanintain 3 Tabel :
1. Neighbor Table
    - Menampilkan Informasi direcly connected router
    - Command : Show ip eigrp neighbor
2. Topology Table
    - Menampilkan semua best route yang dipelajari dari masing-masing neighbor
    - Command : show ip eigrp topology
3. Routing Table
    - Menampilkan best route menuju network destination
    - Command : Show ip route

Notes EIGRP :
  • EIGRP menggunakan Autonomous System number(ASN) untuk mengidentifikasi router-router yang sharing informasi route
  • Hanya router yang memiliki ASN sama yang bisa sharing informasi route
Dua step menggunakan routing protocol dinamis secara umum :
1. Pilih Routing protocol
2. Advertise directly connected network (jaringan yang terhubung langsung dengan router)

Keuntungan EIGRP :
  • Terdapat backup route jika best route down (successor = primary, feasible succesor = backup)
  • Mendukung VLSM
Konfigurasi :
1. Konfigurasi Pada router sebelah kiri (R1)
router>en
router#conf t
router(config)#hostname R1
R1(config)# enable secret satu
R1(config)#line console 0
R1(config-line)#password satu
R1(config-line)#exec-timeout 5 0
R1(config-line)#login
R1(config-line)#exit
R1(config)#line vty 0 5
R1(config-line)#password satu
R1(config-line)#exec-timeout 5 0
R1(config-line)#login
R1(config-line)#exit
R1(config)#service password-encryption
R1(config)#int fa0/0
R1(config-if)#ip add 192.168.1.254 255.255.255.0
R1(config-if)#no shut
R1(config-if)#exit
R1(config)#int fa1/0
R1(config-if)#ip add 12.12.12.1 255.255.255.0
R1(config-if)# no shut
R1(config-if)#exit
R1(config)#int lo1
R1(config-if)#ip add 172.16.1.1 255.255.255.0
R1(config-if)#exit
R1(config)#int lo2
R1(config-if)#ip add 172.16.2.2 255.255.255.0
R1(config-if)#exit

1. Konfigurasi Pada router sebelah kanan (R2)
router>en
router#conf t
router(config)#hostname R2
R2(config)# enable secret satu
R2(config)#line console 0
R2(config-line)#password satu
R2(config-line)#exec-timeout 5 0
R2(config-line)#login
R2(config-line)#exit
R2(config)#line vty 0 5
R2(config-line)#password satu
R2(config-line)#exec-timeout 5 0
R2(config-line)#login
R2(config-line)#exit
R2(config)#service password-encryption
R2(config)#int fa0/0
R2(config-if)#ip add 192.168.2.254 255.255.255.0
R2(config-if)#no shut
R2(config-if)#exit
R2(config)#int fa1/0
R2(config-if)#ip add 12.12.12.2 255.255.255.0
R2(config-if)# no shut
R2(config-if)#exit
R2(config)#int lo3
R2(config-if)#ip add 172.16.3.3 255.255.255.0
R2(config-if)#exit
R2(config)#int lo4
R2(config-if)#ip add 172.16.4.4 255.255.255.0
R2(config-if)#exit

Kita akan memberikan Ip add pada setiap PC :

Gambar 2 : IP Address pada PC0
Gambar 3 : IP addres pada PC1


Sebelum kita melakukan konfigurasi EIGRP kita akan menampil routing table sebelum EIGRP :
Gambar 4 : Routing table sebelum disetting EIGRP di R1

Gambar 5 : Routing table sebelum disetting EIGRP di R2


Dari 2 gambar diatas hanya menampilkan direcly connected network pada masing-masing router yang ditandai dengan kode C. untuk menghubungkan router agar berkomunikasi denga network remote (yang tidak terhubung langsung dengan router). maka perlu disetting routing protocol, salah satu contohnya, yaitu EIGRP.

Setting EIGRP di R1
R1(config)#router eigrp 100
R1(config-router)#net 12.12.12.0
R1(config-router)# net 172.16.1.0
R1(config-router)# net 172.16.2.0
R1(config-router)# net 192.168.1.0
R1(config-router)#no auto-summary
R1(config-router)#exit
R1(config)#

Setting EIGRP di R2
R2(config)#router eigrp 100
R2(config-router)#net 12.12.12.0
R2(config-router)# net 172.16.3.0
R2(config-router)# net 172.16.4.0
R2(config-router)# net 192.168.2.0
R2(config-router)#no auto-summary
R2(config-router)#exit
R2(config)#

sekarang kita tampilkan kembali table routingnya pada R1 dan R2.
Gamabr 6 : Routing Tabel setelah di setting EIGRP pada R1

Gamabr 7 : Routing Tabel setelah di setting EIGRP pada R2


sekarang Kita dari PC0 ke PC1

Gambar 8 :Ping dari PC0 ke PC1
Gambar 9 : Untuk menuju pc1. pc0 membutuhkan 3 hops

Ping dari PC1 ke Pc0
Gambar 10 : Ping dan Tracert PC1 ke PC0

Tampilkan Neighbor tabel R1


    Dari ouput table neighbor dapat diketahui bahwa R1 memiliki neighbor 12.12.12.2 (IP address R2)

    Tampilkan Topologi Table di R1


    Tampilkan Informasi routing EIGRP di R1


    Berdasarkan ouput routing infomation di R1, kita bisa lihat bahwa R1 menggunakan EIGRP dengan ASN 100 untuk network 12.0.0.0 172.16.0.0 dan 192.168.1.0.

Tampilkan Informasi Interface EIGRP di R1 :

    Terdapat 4 interface yang disetting EIGRP yaitu Fa0/0, Fa1/0, Lo1,Lo2.

Debug EIGRP pada R2


    Setelah selesai setting EIGRP pada R1, kemudian kita mensetting EIGRP di R2, setelah input network 12.12.12.0 di R2, muncul pesan Neighbor adjancency yang ditambahkan kedalam routing process EIGRP olehr karena itu, saat kita verifikasi Show ip eigrp neighbors R2 akan memiliki neigbor 12.12.12.1 seperti tampilan di bawah ini :
selain itu juga terjadi proses resync saat kita mengetikkan command no auto-summary

Untuk mengaktifkan debug pada EIGRP, gunakan command dibawah ini :

    
untuk menghentikan debug EIGRP packets, gunakan command berikut :R1# no debug eigrp packets

Setting Passive-interface di R1

    Dari output debug packet EIGRP, kita bisa lihat bahwa EIGRP menggunakan paket hello untuk
membentuk relationship dengan router tetangga (adjacent router). Apabila kita mengaktifkan
command passive-interface di interface maka akan menghentikan pengiriman paket hello
sehingga akan mencegah update routing outgoing dan incoming. 
 
Karena Network A dan Network B tidak memerlukan paket hello, maka kita perlu mengaktifkan
passive-interface untuk interface di R1 dan R2 yang menuju Network A dan Network B.  


Dowload file .pkt dan file configurasinya ||DISINI||

QOuTES:
"IF You Can Drema It, You Can Do It"

Referensi :
Ebook "CCNA Lab Guide Nixtrain_1st Edition_Full Version" Oleh : Agus Setiawan.